
How to Make Images That are Moving | Moving Photographs
Moving Photography
Making images that show movement has always been a fascination for me. From the outset of my photography interest, I was often amazed at how the camera could show things that we can't experience in the same way with our own eyes.
When we think about what photography actually is, then I am sure many of us will use different terms and explanations as to what it means. However, for the vast majority of people photography is simply a method to "capture" and record moments in time for whatever purpose.
My own childhood memories of using my Dad's film camera on school trips was exactly for this reason, to take some pictures of where I had been and who I was with at the time, so that I could look back and be able to remember with more detail than my brain could recall.
It was only later in life that I began to question then understand that perception was a distortion, and we are all surrounded by this simple truth that photos were both an opportunity to recall but also able to influence and convey some level of altered reality.
I spent some time researching the differences, and can without hesitation, recommend that you don't do this unless you really do like and understand science. The simple facts are that the human eye and the camera operate very differently so it's actually hard to come up with a definitive comparison that simplifies all that biology vs technology stuff. On top of that, Googling for answers also produces a myriad of opinions, explanations and answers that vary considerably.
So in simple terms and for the purposes of teaching beginners and for use in this blog post I will use the following conversions that seem to be broadly agreed upon by the people in white coats.
Approximate camera settings to match human vision:
Bear in mind, depending on numerous factors including ambient light, subject-to-eye distance, as well as the health and age of the individual, impacts the range of the scale.
Focus - Aperture/Depth of field - F2.8 to F8
Time - Shutter speed/Exposure Time - 1/30-1/100
Perspective - Angle of View - 43mm on a full-frame sensor, 27mm on a 1.6x crop sensor
Dynamic Range - eyes can see anywhere from 10-14 f-stops of dynamic range, which definitely surpasses most compact cameras (5-7 stops), but is surprisingly similar to that of digital SLR cameras (8-11 stops).
Ok, so now we have the science bit out the way, we can, in essence, draw the conclusion that if we use an exposure time longer (slower) than 1/30 of a second we will be showing the time element in a way that our eyes don't witness the scene, and this is also true if the exposure time is shorter (faster) than 1/100.
Great, now we can easily start to make images outside the range of 1/30 to 1/100 to show movement in a way that is different to human perception.
Let's start by having a look at a couple of basic examples using exposure times to freeze and blur motion:
Fast exposure - Freezing motion
Leader of the pack - ISO800 | F3.2 | 1/800 | at 70mm
As you can see from the exposure settings used for this photo of a mud runner the time dimension was faster than human perception at 1/800 so whilst we don't question the sharpness of the perfectly frozen man leading the pack, your own eyes in that moment would not have been able to see it this way - you would have witnessed a blur around the arms/legs/shoulders and so on.
Incoming - ISO200 | F4 | 1/1250 | at 100mm
Again, the human eye can not see this exact moment with the bee sharp in this way.
Long Exposure - Blurring motion
ISO100 | F11 | 1/13 | at 100mm
ISO200 | F16 | "25 | at 100mm
These two images were taken at Charlecote National Trust to demonstrate to a client how the eye perceives time and how the camera can distort that to show the same scene very differently. The second exposure was made within seconds of the first and aperture was adjusted and a 6 stop neutral density filter added in front of the lens to extend the exposure time to 25 seconds.
Coventry Night Shoot - ISO200 | F11 | "20 | at 26mm
If you would like to read more about using neutral density filters, what they are and what to buy then read my previous blog post here: Using ND Filters & Know your camera filters
Key things to remember
Long exposure photography became very popular for a few years when Lee Filters introduced the 10 stop ND filter, known as the "Big Stopper". Images were being churned out at every opportunity to use the light reducing filter and for a while I guess they presented something new and different. However, like most new fads it became all too common and soon lost it's impact as more and more images were made purely for the impact of a long exposure without any consideration of why and so on.
Point 1 - use long exposure or short exposure to convey your intention for the image - shooting just to show a technical process used, sharp or blurred, doesn't make a good enough reason in my opinion.
Point 2 - evaluate subject/scene to consider what is already moving and what remains static. You often do not need to add filters to capture movement and motion. Experiment with your exposure settings (ISO,Aperture,Shutter) in the available light with the speed of subject movement until you get the right combination you are looking for.
Lundy Set - ISO200 | F14 | "4 | at 35mm - No ND filters
Remember you will probably need to have several attempts to get the result you want. Both these images were taken with no filters, just experimentation with exposure times.
Dancing - ISO200 | F8 | "1 | at 200mm
Rush Hour - ISO400 | F27 | 0.7 | at 70mm with 0.6 ND Filter
Point 3 - There is nothing worse than a sharp image of a fuzzy concept is something you will have heard me say in my classes. Sharpness, in my view, is very overrated. My own thought is that our need for sharpness, particularly in photography, stems back to our early childhood days of seeing photographs of family members, in that context sharpness is probably important in order to distinguish them and see details about them.
Unfortunately the legacy of experiencing those photos seems to have naturally transferred to all photographs for most people and we have an expectation that a good photo first of all needs to be sharp and in focus. Any deviation away from this tenet makes people uncomfortable and it's harder for them to express acceptance, pleasure or judgement on the image without first questioning their intellectual prejudices, which they generally don't do.
The degree to how sharp parts, or all, of your image is should be a conscious considered decision, not one that occurs because that was the mechanical outcome of the camera and available light with the exposure settings you dialed in. Of course this may be where your first test shots start but the photographer will then go onto experiment, make adjustments and repeat until they are satisfied that the concept is clear and sharpness occurs only where it is wanted and to the degree they require it.
Introducing unnatural movement
ICM (intentional camera movement) is nothing new in photography technique and has been a populist style for over a decade. There are several methods of camera movement. Let us discuss them each in turn.
Moving the camera during the exposure to cause all parts of the subject and scene to be rendered blurred. This style fascinates me as can be used to produce a very ethereal feel to an image. It takes some practise as when not quite right it just looks like camera shake, therefore the amount of movement of required is essential to get right, in your opinion.
Panning - Vertically and horizontally in a straight line
This technique works well where there are lines in the composition, it's natural to move the camera in the same direction as the lines.
Poplars - ISO100 | F29 | "1 | at 100mm No filters
This was a vertical pan of reflected poplar trees at Brandon Nature Reserve. I used the small aperture of F29 to get a long exposure of 1 second.
Surf Pan - ISO50 | F64 | 1/8 | at 400mm No filters
This was a horizontal pan of the wave crashing onto the shoreline - In this example I moved the camera from left to right at the same time as taking the photo, trying to ensure that my horizontal movement was at the same pace as the incoming wave.
Random movement of the camera
It's not just a case of simply jiggling the camera around, though essentially that is what you are doing; you'll need to experiment with how much "jiggling" works and for how long to jiggle for.
Simpler compositions seem to produce better results with this technique as it's easier to still identify subjects and contrast without it just looking like you dropped the camera.
Play around with how much movement and for how long you move the camera too. For example you could go for a 5 second exposure and not move the camera for the first 4 seconds of the exposure and just the last second.
Fern Arch - ISO100 | F22 | 0.7 | at 200mm
Chris Friel and Doug Chinnery use these techniques really well among others, so do some research and look at their work for ideas and inspiration but remember ultimately decide on how much works for you.
Multiple Exposure
Whilst not strictly movement there is of course movement because the image is blended from more than one exposure each time moving the camera to adjust the composition. Valda Bailey and Chris Friel are, in my view, the masters of this technique. Valda really uses colour and texture to emphasise her compositions, often abstract but usually intriguing to the viewer.
This technique requires a camera body that automatically allows for multiple exposures otherwise you will need to just do your own blending of single exposures in photoshop.
It may seem random but am I am sure if you study Valda's work then you will see it is anything but random. Clearly it takes a lot of practise and careful understanding of your subjects to make this work well.
One of my early attempts at multiple exposure, of a wild meadow and then over layed with a water reflection.
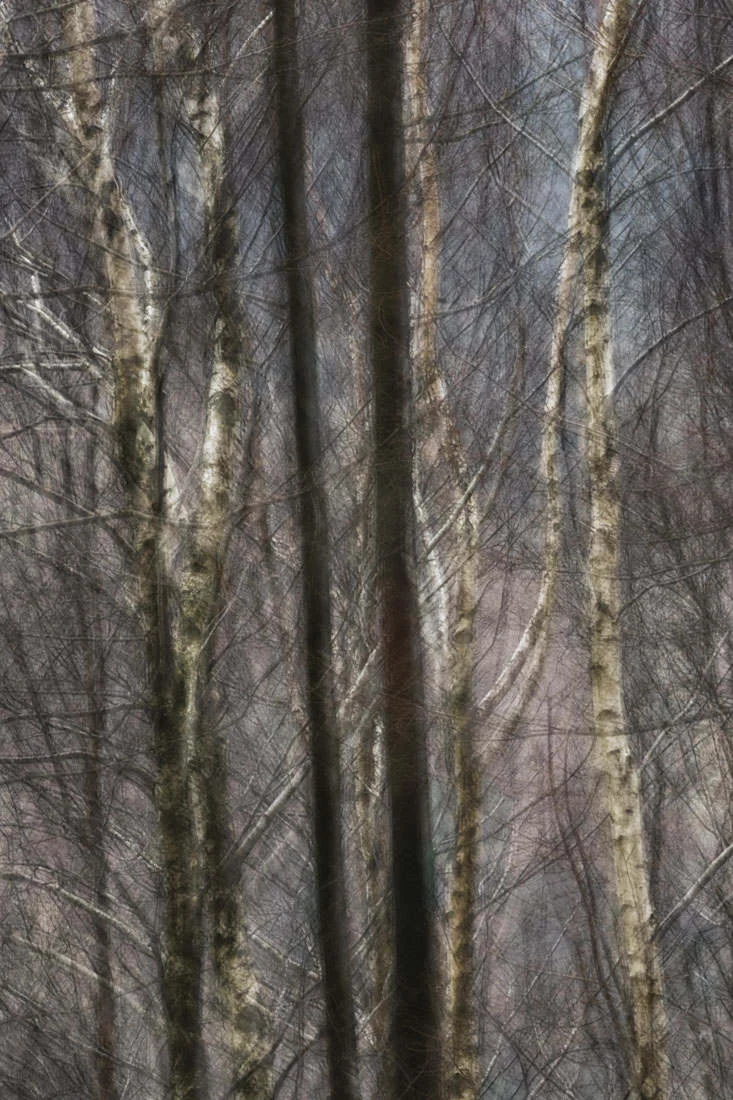
Woodland Arch - ISO200 | F13 | 0.7 | at 70mm & ISO200 | F16 | 1/30 | at 70mm
In this image I took two exposures. The first was a straight sharp shot of everything the second a vertical pan shot. The two two exposures were then blended with masks in Photoshop to keep the foreground tree trunks from the sharp image and the background trunks from the panned image.
Radial Blur/Movement
Finally but no means least is moving the zoom ring on the camera. Either forwards into the frame or backwards out of the frame. Both have a radial zoom effect in your image and it's something most beginner's try a few times for a "novel" effect but then quickly move on.
Tree Zoom - ISO100 | F22 | 0.6 | Zoom burst 16 to 35mm
I hope this gives you a few ideas and shows just how much opportunity there is to use movement in photography. There are always plenty of opinions to be heard about what works and doesn't but ultimately you are the only judge of your image.
I heard a quote a while ago (can't recall where and who) that echoed my approach to photography - "photography should mirror your feelings, abstracted from reality, excised from context and made to be restaged in a theatre of just one. The theatre, the author's mind and heart but a safe place to play out the scene knowing the curtain can fall anytime to end the performance."
In our world of constant scrutinisation and examination of technique and method it's often easy to forget why we got into photography in the first place. That basic enjoyment we get from experimentation and making images that appeal to all parts of our personality are surely one of the great things about this art. So go out there with your camera, play and have fun with it and don't worry whether it conforms to how images should be made - you will find the right balance for you right now and that's all that matters.