
Exposure Bracketing Photos - Dynamic Range | A Guide
Exposure Bracketing Explanation
Dynamic Range what is it?
Have you tried to take a photo of a sunset or similar "high contrast" situation and the result is not what you expected or wanted? Typically this high contrast light (the difference between light and dark in the picture) produces a silhouette of the objects that are in the shadows as the camera tries to expose for those lovely tones in the sky. Alternatively the camera exposes for the darker areas (shadows) and the result is the sky turns to white in your picture! Sound familiar?
This happens because the range of light (known as the dynamic range) is greater than the camera is able to record in a single exposure (frame).
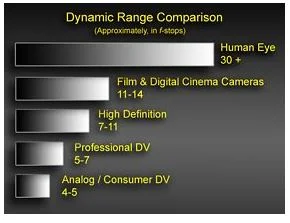
The human eye can record approx 30 stops of dynamic range where as the camera is between 8 and 14 depending on what type you are using.
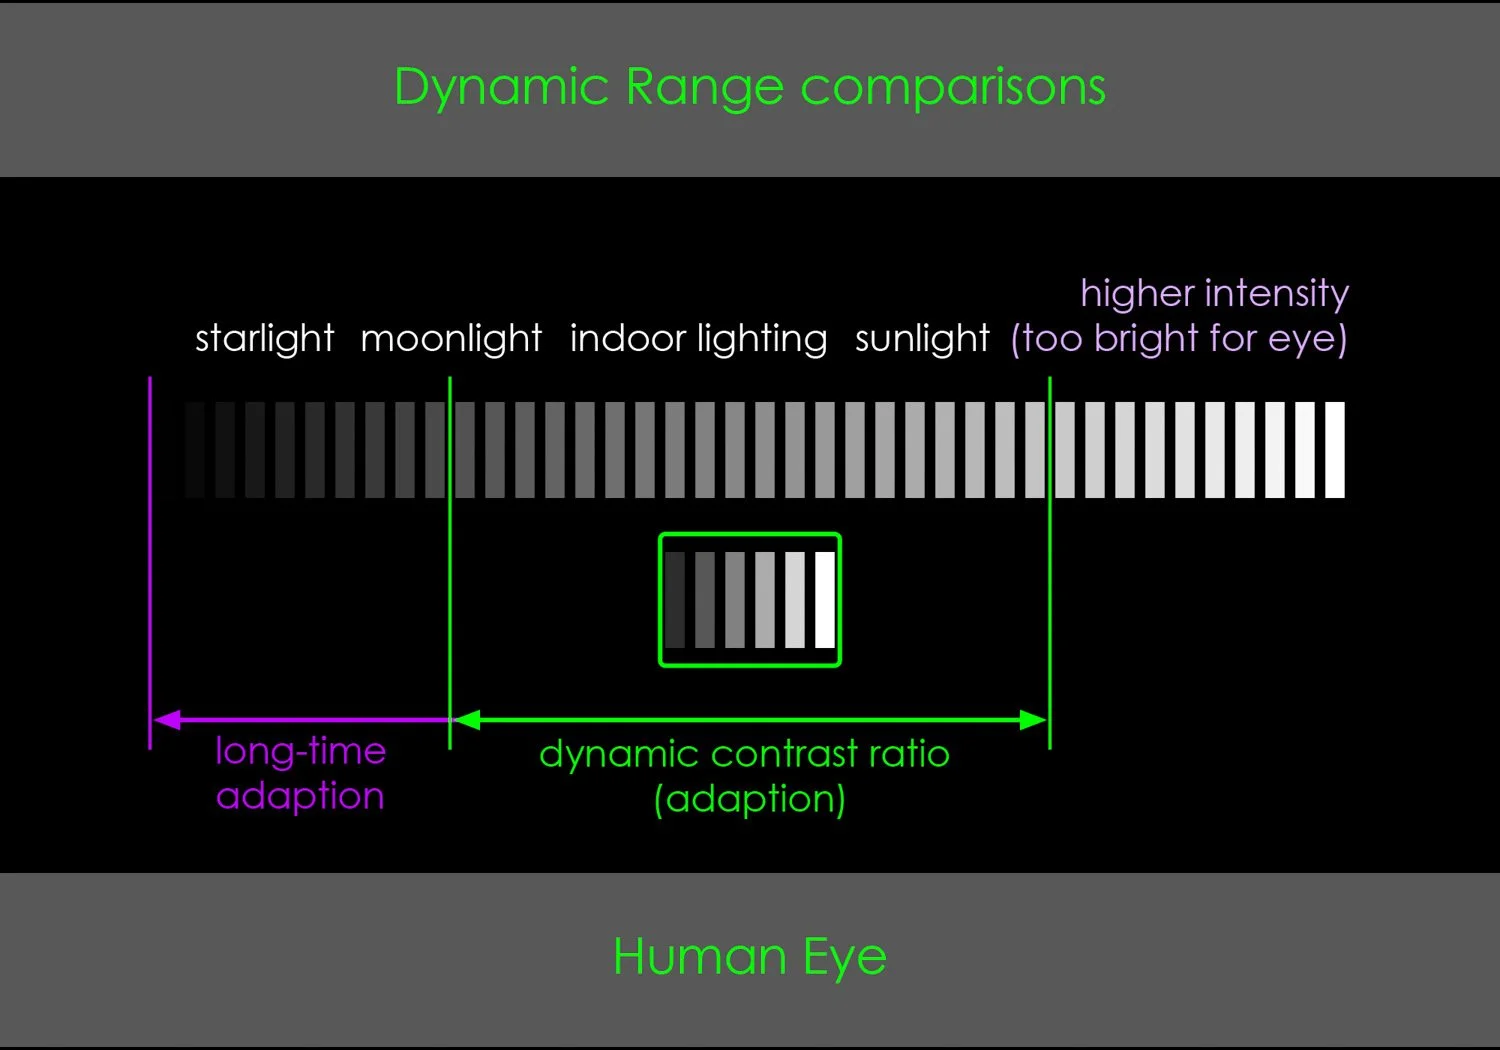

Dynamic range of light
Dynamic range comparison - exposure bracketing
Without getting into the science and technology of dynamic range, optimal light performance, ISO, resolution, detail and other factors that contribute to the quality and intensity of light being recorded on the sensor, when we are faced with a high dynamic range scene we have choices and decisions to make.
Choices to capture high dynamic range images
The most obvious option but often ignored - change your composition so that you reduce the amount of bright and dark areas in the frame. Maybe you don't need so much of the foreground/landscape if taking a photo of the sky and its rich and intense colours and light.
Use graduated neutral density filters to reduce the density of the bright areas of the image - typically the sky or reflected light on wet surfaces or water. This will reduce the dynamic range of light and hopefully enable you take the image with a single exposure.
Even if you do both of the above, you may still have a scene with a dynamic range greater than the camera can record. When faced with this situation then you will need to take more than one exposure of the scene. Taking multiple exposures of the same scene is called bracketing exposures. The amount of exposures required will depend on the dynamic range you need to record to capture details in the shadows and highlights.
Most camera's come equipped with AEB (automatic exposure bracketing) which allow the user to set the qty of exposures required and the number of stops of exposure between each frame. Some camera's also come equipped with the ability to not only take a number of exposures but also to merge them together in camera for you. The iPhone also has this but is restricted to two frames only. This is known as HDR - High Dynamic Range.
To get the best results from bracketed exposures you will need learn how to blend the frames together in software afterwards.
Tips to Exposure Bracketing
Use a tripod so that there is no change in camera position between frames
Use a remote release cable to avoid camera shake between frames
Check your first and last exposure to make sure you have data in the shadows and highlights
Bracketed Frames

3 bracketed exposures with histogram to show 2 stops either side of the metered exposure
Merging the Exposure bracketed frames
There are several methods for combining the bracketed frames on the computer. Everyone has their favourites and it's largely subjective because depends on your taste or lack of it!
My tip for merging your frames is to not try and do the editing/processing as part of the merging process. Treat the merging of the frames as simply that - the process to give you a good digital negative to work on separately - treat this as stage 1 to get a good single combined image without thinking about sharpening, colour, contrast and so on.
Top image the blended exposures - without any additional processing (exposure fusion)
Bottom image the processed image using Adobe Lightroom
If you want to learn more about dynamic range, bracketing using filters and the software and techniques to process images then join me on:
Bracketing & Filters Master Class
Lightroom Course for Beginners
If you want to buy filters then I recommend Linhoff Studios who will give you a 10% discount off the RRP if you tell them you are a customer of Alan Ranger Photography. I have also worked with Linhoff to put together various filter kits from entry level to more advanced. Details of the Filter Kits are here