
07 Explaining EXPOSURE BRACKETING- HDR-A Guide for Beginners
Updated 25 Aug 2025
Losing detail in skies or shadows?
Even the best cameras struggle to capture extreme contrast in one shot. Exposure bracketing helps you overcome limited dynamic range by taking multiple exposures and blending them for a balanced result. This guide explains the technique and when to use it for better images.
- Understand: What exposure bracketing is and how it works with your camera’s auto settings.
- Apply: When to bracket — sunsets, backlit scenes, interiors with windows, or high-contrast landscapes.
- Enhance: How to merge bracketed shots in editing software for natural-looking HDR results.
Table of Contents Show
Summary
Exposure bracketing is a technique used by photographers to capture a series of shots with varying exposure settings. It helps overcome the limitations of a camera's dynamic range and ensures well-exposed images in challenging lighting conditions.
There are two methods of exposure bracketing: manual and auto. Manual bracketing provides complete control over exposure settings, while auto bracketing automatically adjusts settings for each shot. To use bracketing effectively, assess the scene, set the camera to bracketing mode, choose the appropriate exposure mode, focus and compose the shot, capture the series, and review the histogram.
Using a tripod, remote shutter release, shooting in RAW format, and experimenting with compositions can enhance the results. Overlapping exposures can limit dynamic range and reduce the effectiveness of exposure bracketing. Exposure bracketing works best for stationary subjects, as moving subjects may result in inconsistencies and ghosting. Post-processing is necessary to achieve the desired final result. Cameras that support exposure bracketing include DSLRs and mirrorless cameras. Mastering exposure bracketing enhances the quality of images.
Exposure Bracketing: A Guide for Photographers
'Capturing the perfect shot has never been easier with the technique of photography exposure bracketing.'
With the ever-improving technology of camera sensors and their ability to deal with high dynamic range scenes in photography, I want to share my 20 years of first-hand experience and my change in approach to exposure bracketing.
Traditionally, I used graduated neutral density filters to deal with the most challenging situations. However, my approach has changed over the last five years as sensor technology has improved dramatically, and photo editing software has, too. These days (the last few years in fact) I rarely use graduated filters to balance the exposure and dynamic range - Not to say that I think this is not best practice, as there are still advantages to using grads rather than bracketing. However, bracketing exposures has meant less gear in my kit bag and generally decent results once I import the images into photo editing software to blend them.
This post explains what exposure bracketing is and how to do it.
What is bracketing?
Photography bracketing, also known as exposure bracketing, is a technique extensively used by photographers to capture a series of shots of the same subject, each with varying exposure settings. This method involves making a sequence of images, where each photo is fine-tuned to have a slightly different exposure, ensuring that the sequence captures the full range of light and shadow. By mastering photography bracketing, photographers significantly enhance their chances of producing a well-exposed image, especially in challenging lighting conditions with prominent shadows and highlights. This technique is used extensively in landscape and property interior photography.
Modern cameras also feature a focus bracketing mode that allows for multiple focus points to create the perfect depth of field tailored to their photography style.
Quick Tips — What is Exposure Bracketing?
- Bracketing means taking a sequence of shots at different exposures.
- Usually 3–5 frames: one exposed normally, one darker, one brighter.
- It helps capture detail in scenes with high contrast or tricky light.
- Final images can be chosen individually or merged for HDR editing.

What Is Sensor Dynamic Range?
Understanding Camera Sensor Dynamic Range
The dynamic range of a camera sensor refers to its ability to capture and reproduce a wide range of tones in an image, from the darkest shadows to the brightest highlights. It is a critical factor in determining the quality of an image, especially in high-contrast scenes.
Components of Dynamic Range
Shadows: The ability to capture details in the darkest parts of an image without losing important information.
Highlights: The capacity to retain detail in the brightest areas of an image without overexposing or blowing out the highlights.
Tonal Gradation: The smooth transition of tones between shadows, midtones, and highlights.
Importance of Dynamic Range
Image Quality: A wider dynamic range allows for more detail and subtlety in the captured image.
Versatility: It enables photographers to capture scenes with high contrast and challenging lighting conditions more effectively.
Post-Processing Flexibility: Images with a good dynamic range offer more latitude for adjustments in post-processing without sacrificing quality.
Measurement and Specification
Dynamic range is typically measured in "stops" or "EV" (exposure values).
Camera manufacturers often specify the dynamic range of their sensors in their technical specifications.
Improving Dynamic Range
Sensor Technology: Advancements in sensor design and technology contribute to improving dynamic range.
HDR Techniques: High Dynamic Range (HDR) imaging techniques can be used to combine multiple exposures to extend the dynamic range captured in a single image.
Understanding camera sensor dynamic range is essential for photographers and videographers as it directly impacts the quality and versatility of the images and videos they capture. As sensor technology continues to advance, improvements in dynamic range contribute to the overall advancement of imaging capabilities.
Why is exposure bracketing important for photographers?
For photographers, mastering the art of bracketing is crucial as it enables them to surpass the limitations of their camera's dynamic range. The dynamic range is the spectrum of light intensities from shadows to highlights that the camera sensor can faithfully record. In high-contrast scenarios, such as landscape photography with a luminous sky and a shadowy foreground, capturing details in both extremes of light and shadow can be daunting. However, exposure bracketing empowers photographers to capture a gamut of exposures, from bright to dark, ensuring that the final image retains the intricate contrast details. See my previous post on dynamic range and using graduated filters
Different methods of exposure bracketing
There are two main methods of exposure bracketing: manual exposure bracketing and auto exposure bracketing. Manual exposure bracketing requires the photographer to manually tweak the exposure settings between each shot, providing meticulous control. Conversely, auto exposure bracketing permits the camera to automatically alter the exposure settings for each image in the sequence, simplifying the task of obtaining a variety of photographs.
Manual exposure bracketing
Manual exposure bracketing offers photographers complete command over their camera's exposure settings. To start manual exposure bracketing, one must switch the camera to manual mode. Then, a series of photographs is captured, with each one slightly altering the exposure settings by changing the shutter speed, aperture, or ISO. Exposure compensation can also be employed to fine-tune the results in Aperture or Shutter priority modes.
What Is Exposure Compensation
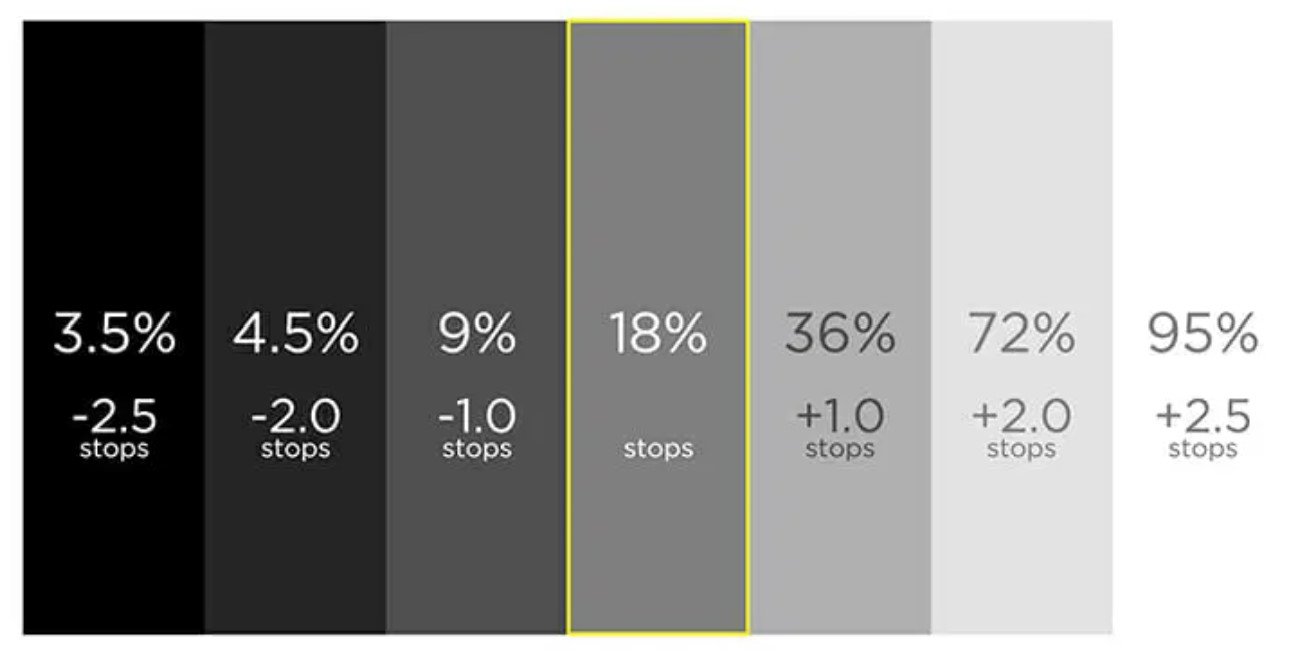
Exposure compensation, a feature present on most digital cameras, allows users to modify the exposure determined by the camera's light meter. It's used to either brighten or darken the exposure from the camera's suggested value and is typically adjusted in increments known as 'stops.' This function is particularly useful when the camera's automatic metering settings fail to represent the desired lighting accurately or when capturing scenes in challenging lighting conditions. Remember the camera light meter is attempting to expose pixels towards 18% Grey (mid grey) so, scenes with large amounts of black or white can cause the metered exposure to be under or over exposed.

How Exposure Compensation Works
Exposure compensation allows the photographer to override the camera's automatic metered exposure settings.
It is often used to correct for predominantly dark or light scenes, such as snowy landscapes or backlit subjects.
By adjusting the exposure compensation, the photographer can ensure that the final image is properly exposed according to their creative vision.
Using Exposure Compensation
To use exposure compensation, the photographer typically needs to access the camera's exposure compensation setting, usually denoted by a "+/-" symbol or AV button.
Adjusting the setting to a positive value increases the exposure, making the image brighter, while a negative value decreases the exposure, making the image darker.
The specific steps for adjusting exposure compensation vary depending on the camera model, so it's important to consult the camera's manual for detailed instructions. Generally, the increments are 0.3 (1/3rd) of a stop.
Importance of Exposure Compensation
Exposure compensation is valuable when the camera's automatic metering settings may not accurately capture the desired exposure.
It gives photographers more creative control over the final image and helps them achieve the intended exposure in challenging lighting conditions.
Photographers who favour meticulous control over their camera's exposure settings often choose manual exposure bracketing. While this method is precise, it entails the risk of variations in the scene's light or moving subjects due to the time elapsed between each frame.
Automatic exposure bracketing - AEB
Quick Tips — How to Do Exposure Bracketing
- Enable Auto Exposure Bracketing (AEB) in your camera’s menu if available.
- Choose ±1 or ±2 stops difference depending on scene contrast.
- Use continuous shooting mode so the camera fires the full bracket in one burst.
- Stabilise with a tripod for best alignment; handheld works if light is good.
- Merge bracketed shots in software (Lightroom, Photoshop) for balanced HDR.
Auto exposure bracketing provides a more streamlined approach to bracketing, where the camera automatically adjusts the exposure settings for each shot in the series. This feature is especially beneficial for capturing scenes with rapidly changing light conditions or moving subjects. Most modern cameras come with an auto exposure bracketing function that can be easily activated through the camera's menu, simplifying the process of taking a series of bracketed photographs.

5 exposures set 1.3 stops apart with the metered calculation set to -1.7
How to use bracketing in photography effectively
To use photo bracketing effectively, follow these steps:
Assess the scene: Before starting your bracketed series, evaluate the lighting conditions and dynamic range of the scene. This will help you determine the number of shots and the range of exposures needed. Alternatively a histogram with a spike at both ends of the graph indicating that the shadows have turned to black and the highlights have turned to white is a sure sign that you need to bracket the exposure.
You can quickly measure the difference between the brightest and darkest points in the frame by taking a spot metering measurement and then calculating the difference in the stops of light to work out the dynamic range required.
Set your camera to automatic bracketing mode: Access the bracketing settings on your camera and choose the number of shots and the exposure increments you want. This will vary depending on the camera model, so consult your camera's manual for specific instructions. Most modern DSLR cameras will do a minimum of three bracketed exposures with up to three stops of light difference. -3, 0, +3. More sophisticated cameras allow you to take more than three exposures, each with a greater range of stops between them if required. Some cameras also require you to switch drive mode to continuous shooting to ensure when you press and hold the shutter release down, all exposures fire automatically in sequential quick succession.
Choose the appropriate exposure mode: Depending on the shooting situation, select the appropriate one, such as aperture priority, shutter priority, or manual mode. This will allow you to control specific exposure settings while the camera adjusts the others.
Focus and compose your shot: Set your focus and compose your shot before initiating the bracketed series. This will ensure that each shot in the series captures the subject in the desired way.
Capture the bracketed series: Press and hold the shutter button to capture the bracketed series of shots. Make sure to keep the camera steady to avoid any blurring between shots. You may need a tripod if the exposure time between shots is slower than you can hold the camera steady to avoid ghosting or out of focus objects.
Review and check the histogram for the darkest shot to confirm the highlights (brightest part) of the image are not over-exposed, and check the histogram for the brightest image to check that the darkest part is not under-exposed.
Quick Reference — How to Use Bracketing Effectively
- Assess the scene: Check lighting contrast and histogram. Spikes at both ends = bracketing needed.
- Measure dynamic range: Spot meter brightest and darkest points; calculate stop difference.
- Set auto bracketing: Enable AEB, choose shots (3+), set ±1–3 stops. Use continuous drive mode.
- Pick exposure mode: Aperture priority for depth, shutter priority for motion, or manual for full control.
- Focus & compose: Lock focus and frame before starting the series.
- Capture series: Hold shutter for sequence; tripod recommended if slower speeds risk blur.
- Review histograms: Darkest frame should protect highlights; brightest frame should protect shadows.
Tips for capturing perfect photos with exposure bracketing
Use a tripod: To ensure consistent framing and sharpness across the bracketed series, it is essential to use a sturdy tripod. This will eliminate any camera shake and make it easier to merge the images in post-processing.
Use a remote shutter release: Using a remote shutter release or the camera's self-timer will further reduce the risk of camera shake when capturing the bracketed series.
Bracket beyond the expected range: To have more flexibility in post-processing, consider bracketing exposures beyond what you think is necessary. This will provide additional options when merging and editing the images. As a go-to, without measuring the dynamic range, I select -2, 0, +2, but I will often move the start point of the metered position from zero to minus 2 if I am trying to resolve highlights. E.G. -4, -2, 0.
Shoot in RAW format: Shooting in RAW format will give you more flexibility during post-processing, allowing you to recover details in both the highlights and shadows.
Experiment with different compositions: While capturing the bracketed series, don't be afraid to try different compositions and perspectives. This will give you more creative options when selecting the final shot. You can sometimes avoid high dynamic range issues by eliminating the cause. Reframing without the brightest or darkest areas in the frame.
Common mistakes to avoid when using exposure bracketing
Overlapping exposures: Make sure there is enough difference in exposure between each shot in the bracketed series. Overlapping exposures can limit the dynamic range and reduce the effectiveness of exposure bracketing. There is little point in doing small increment frames like -0.3, 0, and +0.3 as this small dynamic range is usually easily retained in a RAW file and the photo editing software.
Moving subjects: Exposure bracketing works best for stationary subjects. If your subject is moving, there may be inconsistencies between the bracketed shots, and the blended shots may show signs of ghosting in the moving subjects. Consider using a faster shutter speed to freeze the motion or switch to a different technique, such as an auto HDR (High Dynamic Range) photography setting on the camera. Most editing tools have the option to de-ghost and auto-align the frames.
Neglecting post-processing: Exposure bracketing is only the first step. To achieve the desired final result, post-processing is necessary. Take the time to carefully merge and edit the bracketed images to bring out the best in each shot. Treat the merged photograph as a new RAW file so that you can make the edits and use the layers to enhance the areas of underexposed and overexposed luminosity as you would do for any single exposure.
✓ Do
- Use a tripod or stable support to keep bracketed frames aligned.
- Set bracketing to ±1–2 stops depending on scene contrast.
- Use continuous shooting so all frames fire in one burst.
- Check histogram after the sequence to confirm highlight and shadow coverage.
✗ Don’t
- Bracket handheld in very low light without stability — ghosting will occur.
- Forget to lock focus and white balance; shifts make merging harder.
- Over-bracket every scene; keep it for high-contrast conditions.
- Rely only on in-camera HDR — RAW brackets give more control later.
Post-processing exposure bracketed images.
Post-processing HDR images that have been exposure bracketed typically involves merging the photographs and adjusting the tonal range to create a final image with optimal exposure and dynamic range. Photographers have access to a variety of bracketing software tools to aid this process, including Adobe Lightroom, Adobe Photoshop, and HDR applications like Photomatix, which are designed to facilitate the HDR merging and tonal range fine-tuning. For those new to this technique, a bracketing photography tutorial can be invaluable in mastering these steps.

bracketed exposures and blended result using Adobe Lightroom
To post-process your exposure bracketed images, follow these steps:
Import the images: Transfer the bracketed series to your computer and import them into your preferred post-processing software.
Align and merge the images: Use the software's alignment feature to align the pictures properly. Then, merge the bracketed images using the software's HDR merge or exposure blending function. The algorithm will create masks based on the exposure values and create a seamless blend between exposures, allowing you to apply creative effects and make local adjustments where required.
Adjust the tonal range: Use the software's tonal adjustments, such as exposure, highlights, shadows, and contrast, to fine-tune the overall tonal range of the merged image.
Fine-tune individual exposures: If necessary, use the software's localised adjustment tools to refine the exposure and dynamic range of specific areas in the merged image.
Export the final image: Once satisfied with the post-processing adjustments, export the final image in your desired file format and resolution.
Editing Tips — Exposure Bracketing
- Import RAW files: keep all bracketed exposures together for easy selection and merging.
- Merge carefully: use HDR Merge in Lightroom/Photoshop, or manual blending for more control.
- Align frames: enable auto-align to correct small shifts; crop after if edges misalign.
- Tone map naturally: avoid halos and over-saturated colours; aim for realistic balance.
- Final polish: add local contrast/masks to refine highlights and shadows, keeping detail natural.
Cameras that support exposure bracketing
Modern digital cameras, such as DSLRs and mirrorless cameras, are equipped with exposure bracketing as a standard feature, a cornerstone of bracketing photography. The specific features and options for exposure bracketing may differ based on the camera model, so it is advisable to consult your camera manual for detailed instructions on how to use this function effectively.
Master Exposure Bracketing in Your Photography
Download the 1-page field checklist and take control of highlights and shadows.
Conclusion
Bracketing, and in particular exposure bracketing, is an essential technique that enables photographers to overcome their camera's dynamic range limitations, ensuring well-exposed photographs even under challenging lighting conditions. Mastering both manual and auto exposure bracketing is crucial to what is bracketing in photography, significantly enhancing the quality of your images. By heeding the provided advice and sidestepping common pitfalls, you can adeptly use bracketing to capture the perfect shot, confident you'll have a variety of exposures to select from during post-processing. So, take your camera, delve into the intricacies of exposure bracketing, and take your photography skills to new heights.
If you are a beginner and want to explore more concepts for exposure, basic camera settings and bracketing exposures take a look at my online masterclass series. New topics and dates are added regularly so it pays to check in every now and then to see what is scheduled. If you are local to Coventry then my 5 wk beginners photo course would be the ideal platform to launch your photographic journey.
FAQs — Exposure Bracketing
What is exposure bracketing in photography?
How does exposure bracketing work?
When should I use exposure bracketing?
How many shots and what EV step should I choose?
Do I need special gear for bracketing?
What are the benefits of exposure bracketing?
Are there downsides to exposure bracketing?
How do I merge bracketed photos for HDR?
Is bracketing the same as in-camera HDR?
What are alternatives to bracketing for high-contrast scenes?
📚 Continue Learning
- Next lesson: What is Exposure in Photography
- Next lesson: What is Dynamic Range in Photography
- Next lesson: What is White Balance in Photography
- Personal support: HDR Clinic (Zoom, £29)


Exams & Certification add-on
Already learning with the free course? Unlock all 15 module exams and earn downloadable certificates.
- All 15 modules with progress tracking
- Instant scores & PDF results
- Personalised certificate on every pass
- One-time access — no subscription
The email you enter inside the exam pages is only for saving progress. You must be logged in as a paid member to view the exams.